dear students! Good morning!
Today, we are going to talk about the third-party libraries of the WeChat Open Platform.
I believe that many of you have encountered various problems during the development process.
Today, I will help you all clear up the problems with the WeChat third-party platform SDK.
First, according to the requirements of the WeChat Open Platform, create the configuration for your own HarmonyOS application.
Secondly, when using the SDK of third-party platforms, we must first import the third-party libraries.
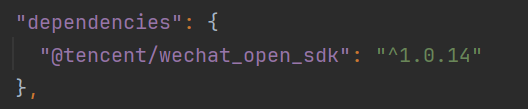
1.The method of introducing third-party libraries in WeChat
ohpm install @tencent/wechat_open_sdk
config image
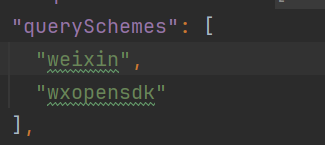
2.Check if WeChat is installed, and then add the following declaration in module.json5 "weixin""wxopensdk"
module.json5 config
3.Configuration and the action agreed upon with WeChat: wxentity.action.open
Configuration
Implement the related functions of WeChat
1.Initialization (requires WeChat app ID)
// WeChat ID
private wxId: string = "wxXXXXXXXXXappid";
// Instantiate the WeChat object
private wx: WXApi = WXAPIFactory.createWXAPI(this.wxId)
// Application Context
private context: common.UIAbilityContext = getContext() as common.UIAbilityContext;
2.WeChat message monitoring
// Initialization
this.wx.handleWant(appWant, WXShareEventHandler)
// Register the Resp event
WXShareEventHandler.registerOnWXRespCallback(handler.onResp)
// Cancel Resp event
WXShareEventHandler.unregisterOnWXRespCallback(handler.onResp)
// Registration Request
Event WXShareEventHandler.registerOnWXReqCallback(handler.onReq)
// Logout Req event
WXShareEventHandler.unregisterOnWXReqCallback(handler.onReq)
Add the listening code file
import { BaseReq, BaseResp, Log, WXApiEventHandler } from "@tencent/wechat_open_sdk"

const kTag = "SharePluginWXApiEventHandlerImpl"

export type OnWXReq = (req: BaseReq) => void

export type OnWXResp = (resp: BaseResp) => void

class WXApiEventHandlerImpl implements WXApiEventHandler {
  private onReqCallbacks: Map<OnWXReq, OnWXReq> = new Map
  private onRespCallbacks: Map<OnWXResp, OnWXResp> = new Map

  registerOnWXReqCallback(on: OnWXReq) {
    this.onReqCallbacks.set(on, on)
  }
  unregisterOnWXReqCallback(on: OnWXReq) {
    this.onReqCallbacks.delete(on)
  }

  registerOnWXRespCallback(on: OnWXResp) {
    this.onRespCallbacks.set(on, on)
  }
  unregisterOnWXRespCallback(on: OnWXResp) {
    this.onRespCallbacks.delete(on)
  }

  onReq(req: BaseReq): void {
    Log.i(kTag, "onReq:%s", JSON.stringify(req))
    this.onReqCallbacks.forEach((on) => {
      on(req)
    })
  }

  onResp(resp: BaseResp): void {
    Log.i(kTag, "onResp:%s", JSON.stringify(resp))
    this.onRespCallbacks.forEach((on) => {
      on(resp)
    })
  }
}
export const WXShareEventHandler = new WXApiEventHandlerImpl
3.WeChat Sharing
Key point: Package the shared fixed elements into the "shareType" method
Parameter 1: shareType - Sharing Type
0: SendMessageToWXReq.WXSceneSession (Friend)
SendMessageToWXReq.WXSceneTimeline (Friend Circle)
Parameter 2: object: Sharing object
textObject: Sharing Content Object
imageObject: Sharing Image Object
webpageObject: Webpage Sharing Object
miniProgramObject: Mini Program Sharing Object
shareType(shareType:number,object:WXMediaMessage,handler?:HandlerAction):SendReqResultWrap{
    let req = new SendMessageToWXReq()
    req.scene = shareType

    let mediaMessage = new WXMediaMessage()
    mediaMessage.mediaObject = object
    mediaMessage.title = message.title
    mediaMessage.description = message.description

    req.message = message

    this.wx.sendReq(this.context,req)
}
Copywriting Share
const textObject = new WXTextObject()
textObject.text = args
this.shareType(0,textObject)
Image sharing
const imageObject = new WXImageObject()
imageObject.uri = fileUri.getUriFromPath("file://path");
this.shareType(0,imageObject)
Webpage sharing
const webpageObject = new WXWebpageObject("https://xxxxxxx")
webpageObject.webpageUrl = args
this.shareType(0,webpageObject)
Mini-program sharing
const miniProgramObject = new WXMiniProgramObject()
miniProgramObject.userName = "username"
miniProgramObject.path = "path"
this.shareType(0,miniProgramObject)
4.Launch the WeChat mini-program from the app.
const req = new LaunchMiniProgramReq()
req.userName = "username"
req.path = "path"
this.wx.sendReq(this.context,req)
5.Tap to open WeChat
let ctx = getContext(this) as common.UIAbilityContext
let want:Want = {
    uri:"uri",
    action: "ohos.want.action.viewData"
}
ctx.startAbility(want);
Note: The complete code has been submitted to the HarmonyOS Third-Party Library. Please use the following command to install it.
ohpm install @free/wechat
Calling method
// Share Content
WeChat.install.shareText("text",{onResp:(resp)=>{}})
// Share the picture
WeChat.install.shareImage("https://xxx",{onResp:(resp)=>{}})
// Share the webpage
WeChat.install.shareWeb("https://xxx",{onResp:(resp)=>{}})
// Share Mini Program
WeChat.install.shareMini({username:"username",path:"path"},{onResp:(resp)=>{}})
// Open the WeChat mini-program
WeChat.install.openMini({username:"username",path:"path"},{onResp:(resp)=>{}})
// Open WeChat
WeChat.install.openWX("uri",{onResp:(resp)=>{}})
If you like this content, please give a little heart!


